Showing posts with label Salt Sisters. Show all posts

Thursday, April 5, 2012

Saving Money with a YUMMY Recipe!

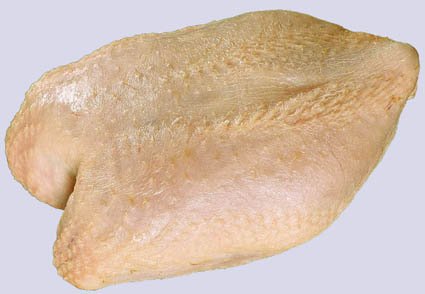
It seems as though every time I go to the grocery, I notice food costs continuing to go up.  One way I save money is by buying bone-in, skin-on chicken breasts instead of boneless, skinless chicken breasts.
See full size image


Now, before I go on any further with this post, I have to share my tale of woe.  I had taken pictures of how much chicken I got off of my bone-in, skin-on chicken breasts, the prep work I did ahead, and the final food created with the recipe which will follow, but I had a mishap, and the pictures didn't end up on my phone.  When I told my husband about this, he said with a hopeful tone, "Soooooo....you have to make it again?!?"  To say the recipe I made last night was a hit is an understatement.  Since I didn't want to wait to post this until next week, when I make this again, I thought I'd go ahead and post, even without the pictures.  Please forgive the lack of pics!  :)

So back to the money savings here...  I put the bone-in, skin-on chicken breasts in a gallon sized bag with the marinade the night before I was going to grill them.  The package of chicken I was able to get on sale had three enormous pieces in it, and was $2.97.  It was an awesome deal! 

After marinating chicken overnight, I grilled the chicken when I had the grill going for another meal.  I wanted to get the chicken cooked so I could have a quick meal the following night.  I allowed the chicken to cool after I grilled it, so I could easily take it off the bone.  I put the chicken in a plastic container and stored it in the fridge.  I also cut the onions and peppers the night before.  Storing them in a gallon sized bag was an easy way to have everything ready to throw together when I wanted to prepare them.

The flavor of brushing the lime butter over the quesadillas gives this recipe a blast of flavor on the shell of the tortilla.  I sprinkled a bit of  Fleur de Sel Salt from the S.A.L.T. Sisters website.  This salt works wonderfully as a finishing salt and added the perfect touch on these quesidillas.  (You can order it here:  http://www.saltsistersonline.com/classicsalt/product/fleur-de-sel-organic-french-grey-sea-salt

With a bit of thinking ahead, you can easily save money and have a delicious meal with this recipe.  Please let us know how you like it if you try it!  :)

-Olivia

Margarita Chicken Quesadillas

Recipe from:  Taste of Home

Ingredients

  • 4 boneless skinless chicken breast halves (5 ounces each)
  • 3/4 cup thawed frozen limeade concentrate
  • 1 large onion, sliced
  • 1 medium sweet orange pepper, julienned
  • 1 medium sweet yellow pepper, julienned
  • 2 tablespoons canola oil
  • 1/4 teaspoon salt
  • 1/4 teaspoon pepper
  • 4 flour tortillas (10 inches)
  • 1 cup (4 ounces) shredded Monterey Jack cheese
  • 1 cup (4 ounces) shredded cheddar cheese
  • 2 tablespoons butter, melted
  • 1 tablespoon lime juice
  • 1 tablespoon chopped fresh cilantro
  • Lime wedges, optional

Directions

Place chicken in a large resealable plastic bag; add limeade
concentrate. Seal bag and turn to coat. Refrigerate for 6 hours or
overnight.

In a large skillet, saute the onion and sweet peppers in oil until
tender; season with salt and pepper. Set aside.

Moisten a paper towel with cooking oil; using long-handled tongs,
lightly coat the grill rack. Drain and discard marinade. Grill 5-8 minutes
on each side or until a thermometer reads 170°. Cut chicken into 1/4-in. strips; set aside.

On one half of each tortilla, layer Monterey Jack cheese, chicken,
pepper mixture and cheddar cheese; fold over. Place quesadillas on a
baking sheet. Combine butter and lime juice; brush over tortillas.
Bake at 350° for 8-10 minutes or until cheese is melted.

Cut each quesadilla into 4 wedges. Sprinkle with cilantro; serve with
lime wedges if desired. Yield: 16 wedges.

Sunday, February 5, 2012

Rosemary Garlic Focaccia


       Olivia found this recipe, prepared it and then served it in her own unique way.  To make the herb oil, she used about three tablespoons of minced garlic in a jar and generous quantities of rosemary.  The rosemary came from a plant still thriving on her front porch in February!    
        When the focaccia came out of the oven, Olivia sprinkled it with parmesan cheese.  For dipping sauce, she combined parmesan cheese, the herb oil and a great ingredient called Charmane's Bread Dipping Seasoning.  This delightful blend can be found at www.SaltSistersOnline.com.  
         The "stick bread", as our friend Liz in California calls it, is well worth the effort and keeps well in the refrigerator for several days.  If you have some left after that, cut it in cubes, dry it in a low oven, and make yourself some super tasty croutons for soups and salads.


-Nanette

Rosemary Garlic Focaccia

Yield: One 12×17-inch loaf
Active Prep Time: 1 hour
Inactive Prep Time: 11 hours
Bake Time: 20 minutes

For the Bread:

5 cups bread flour

2 teaspoons salt

2 teaspoons instant yeast

6 tablespoons olive oil

2 cups water, at room temperature

½ cup Herb Oil
Extra olive oil for the pan

For the Herb Oil:

2 cups olive oil

1 cup chopped fresh herbs (any combination of basil, parsley, oregano, tarragon, rosemary, thyme, cilantro, savory, and sage) 
1 tablespoon coarse (kosher) salt

1 teaspoon ground black pepper

1 tablespoon granulated garlic or 5 to 6 fresh cloves, minced

1. To Make the Herb Oil: Warm 2 cups of olive oil to about 100 degrees F. Add 1 cup of chopped fresh herbs or 1/3 cup dried herbs. Add the salt, pepper, and garlic. Stir together and allow to steep while you prepare the dough. You can keep any leftover herb oil in the refrigerator for up to 2 weeks (it makes a fabulous dipping oil!).
2. Stir together the flour, salt, and yeast in a large mixing bowl. Add the oil and water and mix on low speed with the paddle attachment until all the ingredients form a wet, sticky ball. Switch to the dough hook and mix on medium speed for 5 to 7 minutes, or as long as it takes to create a smooth, sticky dough. The dough should clear the sides of the bowl but stick to the bottom of the bowl. You may need to add additional flour to firm up the dough enough to clear the sides of the bowl, but the dough should still be quite soft and sticky.
3. Sprinkle enough flour on the counter to make a bed about 6 inches square. Using a scraper or spatula dipped in water, transfer the sticky dough to the bed of flour and dust liberally with flour, patting the dough into a rectangle. Wait 5 minutes for the dough to relax.
4. Coat your hands with flour and stretch the dough from each end to twice its size. Fold it, letter style, over itself to return it to a rectangular shape. Mist the top  of the dough with spray oil, again dust with flour, and loosely cover with plastic wrap.
5. Let rest for 30 minutes. Stretch and fold the dough again; mist with spray oil, dust with flour, and cover. After 30 minutes, repeat this one more time.
6. Allow the covered dough to ferment on the counter for 1 hour. It should swell but not necessarily double in size.
7. Line a 17 by 12-inch sheet pan with baking parchment and drizzle ¼ olive oil over the paper, and spread it with y our hands or a brush to cover the surface. Lightly oil your hands and, using a plastic or metal pastry scraper, lift the dough off the counter and transfer it to the sheet pan, maintaining the rectangular shape as much as possible.
8. Spoon half of the herb oil over the dough. Use your fingertips to dimple the dough and spread it to fill the pan simultaneously. Do not use the flat of your hands – only the fingertips – to avoid tearing or ripping the dough. Try to keep the thickness as uniform as possible across the surface. Dimpling allows you to degas only part of the dough while preserving gas in the non-dimpled sections. If the dough becomes too springy, let it rest for about 15 minutes and then continue dimpling. Don’t worry if you are unable to fill the pan 100 perfect, especially the corners. As the dough relaxes and proofs, it will spread out naturally. Use more herb oil as needed to ensure that the entire surface is coated with oil.
9. Loosely cover the pan with plastic wrap. Refrigerate the dough overnight (or for up to 3 days).
10.Remove the pan from the refrigerator 3 hours before baking. Drizzle additional herb oil over the surface and dimple it in. This should allow you to fill the pan completely with the dough to a thickness of about ½-inch. Cover the pan with plastic and proof the dough at room temperature for 3 hours, or until the dough doubles in size, rising to a thickness of nearly 1 inch.
11. Preheat the oven to 500 degrees F.
12. Place the pan in the oven. Lower the oven setting to 450 degrees F and bake for 10 minutes. Rotate the pan 180 degrees and continue baking the focaccia for 5 to 10 minutes, or until it begins to turn a light golden brown. The internal temperature of the dough should register above 200 degrees F (measured in the center).
13. Remove the pan from the oven and immediately transfer the focaccia out of the pan onto a cooling rack.
14. Allow the focaccia to cool for at least 20 minutes before slicing or serving.
(Recipe adapted from The Bread Baker's Apprentice) 


Left over focaccia cubed and tossed with olive oil, garlic, and kosher salt.  Baked at 340 degrees until lightly toasted.  These are the best homemade croutons for a salad.  They would also be delicious nestled on the top of French onion soup underneath melted cheese.  -Olivia